If you are faced with the task of creating a NUP connector for your Notifier ONYX panels this follow this simple step process.
Take a standard DB9 cable and cut off the male end (end with the prongs sticking out). Now strip back the cable and use a mutimeter to verify the following three pins (#2, #3, and #5). Once you have these verified, mark them down on a paper with the wire color and the pin number.
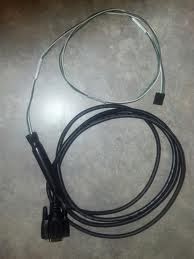
Notifier NUP Programming Cable
Now on the NUP connector, pull off the red and black cables as these are used for power. Simply pull them out of the NUP connector completely and discard.
You should be left with three cables on your NUP connector. White, Green and Brown. With a soldering iron splice the following pairs together. The brown NUP cable to pin #2 on the DB9, the white NUP cable to the #3 pin on the DB9 and the green NUP cable to the #5 pin on the DB9.
Once you are done, make sure to separate each splice with tape or shrink wrap and finally shrink wrap the entire connection.
You should now have a functional DB9 to NUP cable for programming the Notifier ONYX panels and NCM Network Control Module boards.